Many people aren’t aware of a powerful feature associated with the Background Texture control panel in the Studio Artist paint synthesizer. One of the background texture types is called ‘Movie Pixel Index’. It’s one of 2 different background texture types that work with loaded movie files. What’s unique about the Movie Pixel Index texture type is that the movie frame indexing for the texture movie file is updated for each pixel as the paint synthesizer renders a brush nib. This allows for pixel accurate hatching patterns to be derived off of the individual movie frames.
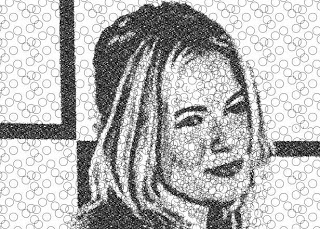
The image at the top of the page is an example of how you can use movie pixel indexing to build a paint preset that generates a black and white hatching effect. This preset called Circle Hatcher1 is included in your factory paint preset in the Default : general category. It uses a movie brush for the background texture called tex_circle1 that is stored in your Brush folder.
If you look at the individual frames of that movie file you will see that each frame corresponds to a hatching pattern built up from a small number of hatching circle representing a very light gray tone value to a large number of hatching circles representing a very dark tone value. By building your own movie file that defines your own desired set of hatching patterns you can easily modify this default preset to draw with your own unique hatching patterns. One frame of the hatch pattern movie is shown below.

In order to make the hatching patterns seamlessly tile, you can turn on the Path End popup control called Wrap Path at Edge.

Turning on this control will insure that any paint paths you draw wrap at the canvas edges to finish on the other side of the path, leading to a seamless tile.
The hatch patterns in the Circle Hatcher1 preset discussed above were generated using auto-painting with the paint synthesizer circle path shape and a 1 pixel black pen preset. But you are free to hand draw your own hatching patterns if you wish, and you can use any paint presets you want to build up the hatching patterns.
To build you own custom hatching movie file, start by setting the canvas size to something reasonable for a background texture movie brush. For this example i’ll set the canvas size to 64×64 pixel. Then open a new movie stream. Now draw your hatching marks one at a time. You can use the cmnd F shortcut to write frames out to the open movie stream as you build up your hatching pattern. Each frame you write out will be used to represent a constant gray level when you render an image with your custom hatching movie background texture. I used a pencil paint preset and hand drew rough x’s to build up a more organic hatching pattern, as shown below for one frame.

Each time i drew a new x hatch i wrote out a new movie frame. After i had filled in my small hatch pattern canvas with x’s i closed the open movie stream.
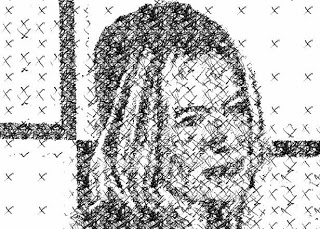
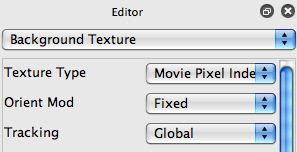
I then imported the Circle Hatcher1 paint preset and then ran the File : Paint Synthesizer : New Background Movie Texture menu to replace the movie file used in that factory preset with my own. I selected the custom hatching movie file i just generated. I then went to the Background Texture control panel in the paint synthesizer and changed the Texture Type popup from Movie to Movie Pixel Index. When i ran the edited paint preset i generated the image below that is based on my own custom hatching patterns i rendered out to my hatching movie file.

You want to try to position your individual hatching patterns as evenly as possible when building up the individual movie frames to avoid introducing repetitive patterning into the final rendered image. You can also experiment with different movie frame sizes for the background texture.
Note that you want to use the Fixed Orient Mod and Global Tracking settings for your Movie Pixel Index background texture. These tracking settings insure that the texture tiles as opposed to some other option like tracking the pen orientation.

This example deals with black and white hatching patterns. However, you could build up color hatching patterns if you wish. Duo-tones or tri-tone patterning can be particularly effective to reproduce simulation of chromolith printing.


