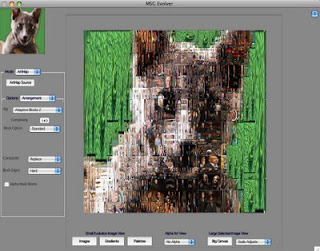
Many Studio Artist users forget about the MSG Evolver application that also ships with Studio Artist 3.5. While MSG Evolver is a great tool for building MSG presets, you can also use it’s Art Mapper functionality to create photo mosaic imagery or even movie mosaics. While you can also create photo mosaic images using Studio Artist’s paint synthesizer, MSG Evolver has a number of unique photo mosaic generation features associated with it’s art mapping functionality. This post is going to quickly run through the basics of using MSG Evolver to create photo mosaic images.
Building photo mosaics in MSG Evolver uses an image database called a Poster Index as opposed to a movie brush like you would in Studio Artist. To create an image database you need to run the Process : ArtMap : Generate Poster Index menu command.
You will first be asked to choose a folder. This is the folder you want to have the images stored in that you are using to generate the sub images in your photo mosaics. You are then asked to name a post and index file. Evolver will then run through analyzing all of the images in the folder you specified. You will see them flash in the source area. After Evolver is done analyzing the images in the folder it will ask you to name a FV (feature vector) file.
The 3 files you named (poster, index, and feature vector) make up the image database Evolver uses for art mapping. A good naming convention is to use the same base name for all 3 and tag -poster, -index, or -fv on the end of the name.
Once you have generated your image database files, you need to tell Evolver to make them the current database. To do this you run the File : Preference : Choose ArtMap Poster Index menu command. You will be asked to choose 3 different files, the Poster, Index and FV files that make up the database. Choose the files you just generated from your custom folder of images.
Once you have your custom database loaded as the Evolver ArtMap Poster Index preference you can start generating photo mosaic images using the ArtMap functionality. First, you will want to switch the Mode popup to ArtMap. There are 4 different Option controls panels in the ArtMap mode.
The Arrangement controls let you choose the kind of photo mosaic effect you want. Arrangement referring to the arrangement of the sub images that make up the photo mosaic effect. The Alg (algorithm) control option is the main option to adjust for choosing different kinds of photo mosaic effects. Each of the different algorithms arranges the sub images in different ways. The best way to get a sense of how they look is to try them out.
The Color option control panel lets you specify how the individual blocks will be colored. You will want to set the color Mode popup to Poster Database Image for creating straight photo mosaic effects. The Art Mapper can also create mosaic images using the current MSG preset, but we’ll ignore that functionality for this particular example. There are additional Color Shift options that can modify the colors of your database sub images to better represent the source image.
The ArtMap process will try to render the current source image, so you should use the File : Open Source Image menu command to load the source image you want to represent as a photo mosaic image now.
When you have setup your Artmap controls and loaded your source image, you can then press the ArtMap Source button to generate your photo mosaic image. You can use the Edit : Resize Big Canvas menu to specify a size for Evolver’s big canvas, which is where the photo mosaic image is generated. Depending on how you setup the ArtMap controls you can generate a wide range of different photo mosaic effects.
This has been a quick introduction into using MSG Evolver to create photo mosaic images or special effects. For more information on using MSG Evolver to create photo mosaic images, you should check out the appropriate sections of the MSG Evolver USer Guide pdf, which is in the doumentation folder in your main Studio Artist 3.5 folder.


